

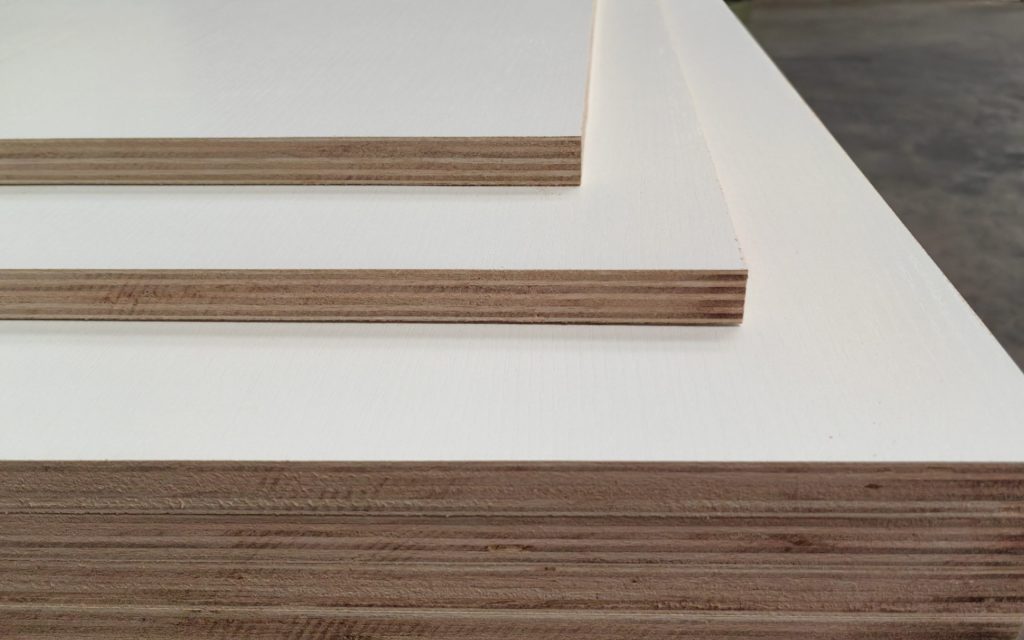
First, a buyer cannot specify veneer faced plywood simply by naming a veneer species. Therefore, importers and furniture factories must decide whether customers will accept natural color variation, how veneer leaves should match, whether the approved grade permits repair, how much sanding margin the order requires, and how handlers must protect the decorative face through export handling. For example, if the purchase order says only “high quality face,” the supplier, inspector, and end user can all interpret it differently.
For B2B purchasing, buyers must specify two systems together for veneered plywood. First, the surface system includes species, cut, thickness, matching, color variation, repair, and sanding. Meanwhile, the substrate system includes the plywood core, face/back balance, bonding, flatness, and moisture condition. As a result, a strong face cannot compensate for a weak or unstable substrate after cutting, finishing, or local warehouse storage.
For technical background on wood appearance, moisture, and movement, see the USDA Wood Handbook. Instead, buyers should define natural veneer acceptance limits in the approved sample and contract.
Veneer Faced Plywood: Separate the Surface System From the Substrate
| System | What to confirm | Common buyer misunderstanding |
|---|---|---|
| Face veneer | Species, cut, thickness, grade, matching, repair, sanding | One species will always look identical |
| Back veneer / backer | Reverse veneer or balancing layer, thickness, appearance grade | The back does not affect stability |
| Plywood substrate | Core material, core grade, glue, thickness, tolerance | A good face means a good core |
| Bonding and sanding | Glue line, sanding allowance, filler, and repair limits | All repairs are either acceptable or unacceptable |
| Packing | Cover boards, separators, corners, straps, pallets | A good factory face will stay perfect in transit |
Veneer Matching Is a Quotation and Lot-Control Issue
First, suppliers can lay up the same wood species as book match, slip match, random match, or another agreed pattern. Consequently, these methods change the visual rhythm, mirror effect, and color banding of the panel. However, cabinet doors, furniture fronts, and side-by-side panels may require a controlled matching logic. By contrast, back panels, packaging panels, or panels that will receive a further overlay may allow a wider visual range.
| Approval item | What the sample or specification should say | Risk when omitted |
|---|---|---|
| Veneer cut | Plain sliced, quarter cut, rift cut, or agreed definition | Unexpected grain and reflectance |
| Matching | Book, slip, random, or specified layout | Inconsistent panel appearance |
| Grain direction | Long-edge or short-edge direction; whether mixed direction is allowed | Mismatch after furniture assembly |
| Panel layout | Continuous grain, paired panels, or numbered sets if needed | Customer cannot align visible panels |
| Natural variation | Allowed color, mineral streaks, knots, and figure | Natural features are treated as defects |
Control Color Variation Without Promising Zero Variation
However, natural veneer changes in color, grain, and sheen even within one log. Therefore, buyers should not set the procurement target as an unrealistic promise of zero variation. Instead, buyers should define a visual window that their market can accept. More specifically, natural variation is related to wood section, cut, and grain. Meanwhile, lot variation may come from different logs or veneer batches. Finally, process variation may come from glue penetration, sanding, finishing, or light exposure during storage.
Therefore, buyers should use a Golden Sample: a full panel with the target substrate, veneer, matching pattern, and sanding condition. Next, approve it under an agreed light condition. Then, retain the master sample, veneer-batch reference, grain direction, and prior lot sample for repeat orders. As a result, this makes it possible to distinguish a tolerable natural change from a change that needs correction.
Sand-Through, Glue Bleed, Cracks, and Face Repairs
Sand-through occurs when sanding removes too much of a thin veneer and exposes the substrate, filler, or a visibly different layer. However, it may become more obvious under raking light, stain, coating, or after furniture assembly. In addition, glue bleed, open joints, splits, and visible repairs can downgrade a decorative face. Therefore, the correct requirement is not that every panel has zero natural character. Face grade, back grade, and final use should define which features each grade permits and where.
| Condition | Likely cause | Inspection decision |
|---|---|---|
| Sand-through | Thin veneer, insufficient sanding allowance, local high spot | Inspect under raking light; visible furniture faces normally need stricter rejection |
| Glue bleed | Glue spread, pressure, veneer porosity, pressing | Judge its effect on staining, coating, and appearance |
| Open veneer joint | Moisture, joining, storage, or lamination stress | Check width, location, and finishing risk |
| Patch or filler | Repair of a natural veneer feature | Define whether allowed, plus size, quantity, color match, and location |
| Dents and scratches | Handling, stacking, straps, or insufficient protection | Separate factory defects from transit damage with packing evidence |
How Core Grade Affects the Decorative Face
However, a premium face cannot remove substrate risk. Consequently, higher-grade core veneers are normally more complete and even, with fewer voids and overlaps, which supports flatness, stable lamination, and furniture machining. By contrast, mid-grade cores can allow reasonable joints and limited repair, but should not contain obvious voids, decay, or major overlaps. Similarly, lower-grade cores may contain more variation and repair. Therefore, buyers can use them for lower-cost or non-visible applications, but they should recognize the higher risk of local sink, core voids at cut edges, and telegraphing through a decorative surface.
Therefore, specify face grade, back grade, and core grade separately. In particular, this matters for thin veneer, dark stain, and high-gloss finishing, where inspectors can see substrate unevenness and glue-line issues more easily. Momentimber can align the face specification with the core construction through its veneer faced plywood supply options.
From Sample Approval to PSI
- At sample stage, confirm the full panel, veneer species, cut, matching, color window, substrate, thickness, reverse side, and flatness.
- At PPI, check the target veneer lot, matching method, substrate, and first-off sanding condition before mass production.
- During production, sample joints, sand-through, glue bleed, repair, color variation, flatness, and cut edges by visible and non-visible grade.
- At PSI, compare under agreed light with the Golden Sample and photograph full panels, raking-light views, corners, cover boards, and pallet labels.
- For a claim, link the order, sample number, sampling plan, defect location, and packing condition.
For general plywood construction information, see APA plywood technical information. Likewise, keep the appearance grade for a veneer-faced order anchored to the approved sample.
In practice, Momentimber supports sample confirmation, production follow-up, pre-shipment inspection, and protective export packing. Therefore, to align veneer, core, back construction, glue, thickness, appearance grade, and inspection evidence for a specific market, discuss your specification with our team.
FAQ
Conclusion
Ultimately, a veneer faced plywood quality program is not about using a vague phrase such as “beautiful face.” Instead, it turns matching, color, sand-through, repair, core, and packing requirements into standards that buyers can approve, inspectors can check, and both parties can trace across lots and markets.
recent posts
Sanded OSB for Furniture Still Needs a Finish Plan
OSB material reference only; sanding quality and the final finish need separate approval. Sanded OSB…
Plywood vs OSB for Crates Is More Than a Price Choice
Protected panel bundles are a supply-stage reference, not an approved design for a shipping crate….
Blockboard vs Finger Joint Board for Furniture Buyers
A visible timber-strip core does not make the finished panel the same as an exposed…
Synchronized Melamine Board Goes Beyond the Print
Woodgrain design reference only. A flat image cannot demonstrate EIR texture or alignment. Synchronized melamine…